Saturday, 10 July 2021

The Vivien Blouse

The Vivien Blouse 

I recently joined a pattern testing group hosted by Romy (mrsenglishroseromy on Instagram) for her brand new pattern, a 1940s blouse.  Loving vintage style as much as I do, I was so excited to be involved in Romy's project .  I had seen, and also sewn, some 1940s blouse patterns from Etsy, mostly PDF patterns, and wondered how this one might be different.


The pattern comes in a size range of UK 6-26.  I used a size 10.  It comes in a tiled PDF and will be available as a printed version once it is on general release.  Using the PDF version the tiles were easy to put together.  All the sizes on the pattern are easily  identifiable and seam allowance is included, so no guess work there.  I drew around the size I wanted and then traced the  pattern using  good ole greaseproof paper so the pattern was more pliable and easy to work with.  If you wanted to you could easily trace the stitch line onto your fabric before piecing together.

So, for the construction.  I used a green/blue anchor print cotton which I found on holiday in Bude at a cute little fabric store called The Remnant House. 
 
The Remnant House. Bude

It's light yet crisp, a bit like it's been starched, and so perfect for giving the blouse some structure yet not heavy,  I would definitely use a crisp cotton for this pattern again but of course, the blouse can be made in any suitable fabric.

I chose to make version B and once I'd marked the darts using carbon paper and tracing wheel I was surprised at how quickly the project came together.  The blouse has a yoke and this could easily be self-faced to add a bit more body to the upper bodice. This really is an easy sew for someone with a decent amount of sewing experience, and therefore relatively easy for a beginner.  Tbe gathering markings were well marked and easy to do.   The instructions were clear to follow and there weren't any moments of "heck, what do I do here".  I particularly like how the armbands on the short sleeve version look like a cuff but don't require fiddly cuff sewing with a bound split and button opening - they just attach, fold and slipstitch.  


Both the front and the back of the blouse have gathered bodice pieces from the yoke and, together with the waist darts these give a good vintage silhouette, together with a large pointed collar for the forties vibe.    I just needed to add some vintage-style buttons (complete with anchor design) to finish off the blouse perfectly.


As a pattern tester I stuck rigidly to the pattern instructions but this is a pattern you could definitely hack if you wanted to.  For example, take out some of the back gathers for less fullness, make the darts smaller or omit for a blousy, albeit less forties, feel.  I think I would even extend the whole garment and possibly make a button front dress.  It's also a garment that could be either summer or winter wear (thinking under a vintage suit for example)

So, all in all, a versatile easy sew with a look that does what it's designed for.  Well done Romy and thank you for letting me be a pattern tester.  I'll look forward to making lots more in this pattern 

Happy Sewing 

Linda xx


Pattern available from English Rose Patterns on Etsy from 12 July 2021.


Monday, 25 February 2019

The Day and Night Dress Challenge - 2019

Ever on the lookout for a good sewing challenge, whilst browsing for upcoming challenges in January I found the #dayandnightdresschallenge hosted by Elizabeth of Elizabeth Made This which you can find here .  The concept of the challenge is not to make a new garment, but very cleverly, to dig out an old unloved garment, which should ideally be one of your previous makes, and make two items to take it from day to night.


I mused a little over this one, thinking what a great idea this was to bring an unworn garment back to life, and after a rummage in my wardrobe found this dress I made about two and half years ago which had seen little wearing.

I

It's a good old shift dress, made using a mix of velvet and lace and with a sassy back slash (saved me from trying to attach a zip to lace)

I'd made it for my birthday and strangely, had made one sleeve too tight at the bicep - either that or I'd been overdoing it at the gym - nah!  The challenge gave me the impetus to rectify the annoying sleeve so the dress would be wearable again, with or without a challenge.

Bug sorted, I thought further on what to bring to the heart of the challenge.  Well, if you know me, you know I have an eye for a bargain and whilst mooching one lunchtime I found a wool and cashmere coat in a thrift shop for the princely amount of £2.99 - yes you read right - CASHMERE
for £2.99.  So - take a look at this coat.


You may wonder what's wrong with it - I wondered what's right with it (OK apart from CASHMERE).  Majorly oversized, big sleeves, sack-like, but I could see it's potential.


After a vast amount of pinning I had an alternative shaped coat with 3/4 sleeves, also narrowed of course, and lots of  newly constructed darts in the front and back and take-ins at the side seams.  The coat had some strange scarf-like appendage which was great for making a belt to nip in the waist.  Lastly, the hem was shortened and some vast shoulder pads removed.  Apart from that there wasn't much to do.....


My intention was to create a coat with a forties style vibe.  I think I kind of managed to pull it off.  The resulting attire will be given a further vintage makeover with the addition of a hat and maybe
some flowers.

But...... enough.  This isn't a refashion challenge, so - onto part 2, take the dress to night time.  Here's how I did it.


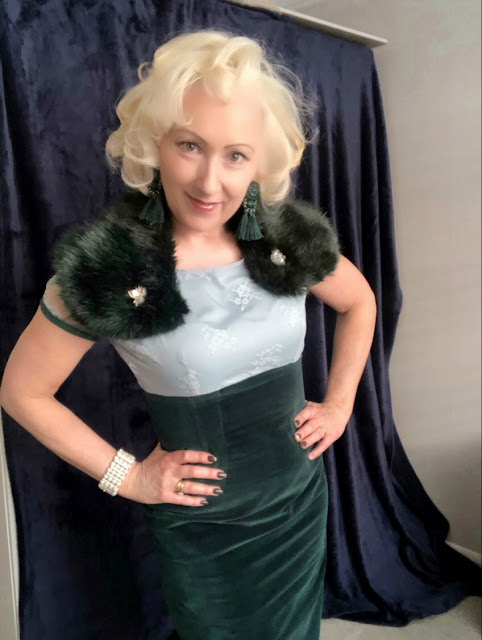
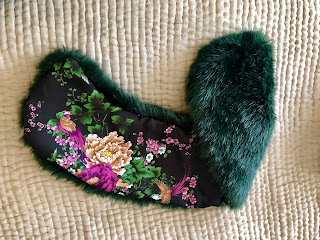
I'm a big fan of fake fur - anything to add a splash of glam to my wardrobe.  So I decided the dress could make it with the addition of some furry sophistication.  Enter 1 metre of forest green plush fake fur.  The perfect piece for a vintage style cozy glam collar.  Coming in a £25 per metre this was over 8 times more expensive than the actual coat.  However, it takes the dress from niceee to woweee and perfectly winter pretty.


As the fur was pretty thick I lined the back with some floral (including green, obviously) satin that I had lying around in my stash.  It wasn't the easiest to sew with but careful cutting helped, that and picking out the fur around theIsewn seams.

 
So, there it is.  One dress, two looks and a bargain spring coat to boot, all in the vintage style.

I hope I've inspired some of you to have a dig in your closet to find that unloved garment and jazz it up.  I think my green dress will definitely get some more wears now.

Happy Sewing

Linda xxx


Thursday, 1 November 2018

Debi & Daisy's Cape Crusade

Well, it sure has been a while since my last post due to, amongst other things, the Blogger app becoming incompatible with my iphone so it really was too much hassle to try to post anything.  You'd think in these days technology would keep up!  However, it's finally managed to catch up and I have a little more time in my schedule to post so, hopefully, there will be some interesting reads coming through on a regular basis.


So I thought for my first post back I'd make it a worthwhile one and have teamed up with Debi of  Ms 1940 Mccall for a fun sewing group challenge.  Debi has a wonderful blog dedicated to sewing up vintage patterns from 1940,specifically McCall ones. She's sewn a whole heap of wonderful garments and has the vintage style nailed.   The plan is to inspire sewists to make a cape - something that'll be very welcome after the British Isles  turning the weather dial to "flippin freezing" this weekend.  I was very excited when she liked the idea of a Cape Sewing Group and I know Debi is too, so we hope you'll join us on our Cape Crusade journey, be inspired by each other's makes and get yourself a stunning piece of memade clothing to boot.

Of course, Debi and I will be participating too for the fun of it - she has already sewn up the most delightful cape "suit" consisting of cape, skirt and blouse which you can see here  for some inspiration.   Just make sure you check out the awesome cape lining - it's dreamy.

I plan to get full on sewing the 1930s Capelet (here ) and below from Decades of Style .  I just love that high collar, the floaty back and the angles on it.  I plan to style it up with some long gloves for a glam look.  If you'd also like to sew this cape then Decades of Style are offering 20% off their patterns at the moment - just pop by through the link on their Instagram page and you'll see the code.  Better hurry though as it's only applicable until the end of this week (that's week commencing 29 October).

Now for the good bit.  As well as taking part and hosting,  Debi and I are offering two lucky sewists the chance of winning some goodies.  Debi is offering a vintage cape pattern whilst I will be throwing in as a prize a metre of 30s inspired crepe de chine that I purchased in Athens during my recent trip there.


The fabric would make a perfect sleeveless blouse - maybe with a vintage pointy or a mandarin style collar; or perhaps you'd prefer a basic shell top, maybe with back buttons, to jazz up your winter suit.  We'll be judging the entries at the end of the challenge and, remember, there are two prizes so there will be TWO winners.  But, hey, it's not just about the prizes, this is a sewing group for fun, so we think it'll be good to follow along the sewing journeys of our Cape Tribe to see what fabrics you have picked, and how your construction is going right up to the styling up of the end product.  The prizes are available to anyone who'd like to take part, wherever you are, so get your thinking cap(e)s on and let's see your ideas.  There's no timescale on the actual making up of the garments, as in this week you do this bit and next week you do that bit, and as it's not a sewalong you can go at whatever pace
 is good for you.  The challenge will run until 2 December so that gives you plenty of time to dip in 
and out of sewing up the garment  - and we'd love to see your construction pics too.  We'll then pick the winners and wing the prizes on their way.

Of course there are few rules for participants.  Here goes:-

1.  Follow both  ms1940mcall and daisycreatesinsussex on Instagram
2.  Repost the notification post 
3.  Tag a friend who you think would like to join in
4.  Tell us what fabric you'd make your cape out of (and the design if you have one in mind).

Then just tag your posts #debianddaisyscapecrusade so we can follow along with you and everyone can see your progress.

Happy sewing Capemakers.   xxx


Monday, 27 November 2017

Blue Velvet, I mean Lurex .....

Good grief, is it so long since my last post?????

I did keep meaning to resolve to post as much as I sew but somehow, life got in the way.  You know how it is.....

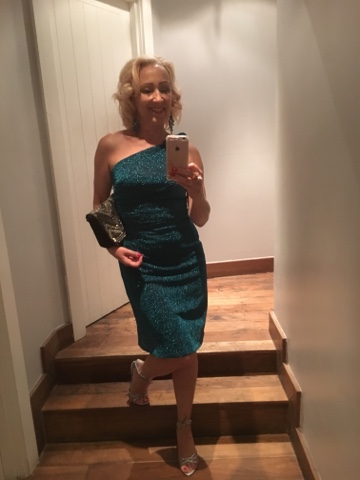
Anyway, I know some of you goody two-shoes manage to post about your sewing makes whenever you finish a project but I'm waaaaaay behind, so here's one I finished earlier, I mean last year......... my blue (bluish-turquoise to be official) one-shoulder glam dress.


The idea started off in my head after seeing a blogger (whose name escapes me for now but I'll rack my brains later) who had made a delightful 3/4 sleeve top in the exact same material. - If you know who you are please tell me and I'll tag you, my brain sees so much exciting inspiration I can't possibly remember from so far back and before Instagram let me save photos so you'll have use your imagination. 


My plan was to make said top so I was delighted to find the exact fabric match in  Fabricland and bought more than enough (just in case I wanted to make a skirt too).

The plan never came to fruition however as I decided I needed a glam dress (as you do) and used said fabric for this dreamy number instead.

It's a Patrones and I had made it before in silk chiffon so I guess that made me an old hand, the lurex being a squillion times more easy to handle than flippery, slippery silk chiffon.  As the lurex is a fairly fine fabric a lining was needed to save my blushes, and a stretch one at that. Eeek - as usual I wanted to make this dress NOW and didn't have time to do online shopping and wait for the postie to deliver.  So.... off I went to my second stash in the loft and came up with this pink camouflage lycra, purchased at Birmgham Rag Market a very long time ago....  what was I thinking when I decided this must be in my stash???  


This just goes to show - that bargain that you think you don't need may one day come in handy.  My turquoise lurex dress has a secret pink combat print lycra lining and it's as comfy as that pair of old slippers you never want to throw out.


Construction was straightforward bodice x 2, skirt front and back.  I put in a side-zipper at the non-shoulder side which worked well and the ties are added in as separate pieces instead of being cut out as all part of the bodice which meant I could cut them from the itty bitty leftovers of fabric.  The detail is some nice little gathers at the waist, but on fitting the gathers bulked into a not so flattering line so I made them into darts to give a smoother fit.


So far, it's only had two wears but it does feel glam so I'm sure it'll get more wears in future, especially since I found the perfect jewellery set to go with it - ebay cheapo bargains sure are the best sometimes!


All in all a great make and a great bargain.

Details: So long ago I can't really remember but about 1.5 m of lures, around £4.00 per metre from Fabricland, Brighton.
Just about a metre of lining - long ago bargain from the Rag Market. 
1 zipper.

Not too difficult apart from the fiddly sewing of said slippery lining.

I hope I've inspired some Christmas frocks out there... Now, back to sewing and hopefully my next blog post will be delivered with a shorter gap than my last one!

Happy sewing

Linda xx

Monday, 5 September 2016

Sewing Saves .........


Rather an ambiguous title for my my most recent scribbling, - apologies for the sparseness of posts, what with working, working out, and life generally, (including fitting in some sewing) the blog seems to have fallen by the wayside somewhat.

Saving money by brewing own tea?
Anyway, back to the saves...................  Sewing saves.. what!  Lives - no that's a bit dramatic;  sewing saves money - not in my case - fabric shops are wallet emptyers.  

No in fact in this case it doesn't save anything.  I was more thinking along the lines of those garments you had such high hopes for and that don't turn out quite the way you had wished....... but then you have an idea whereby you can alter (cos you can sew) and give that destined for the bin, or worse, the UFO pile, a new lease of wearable life.  Are you getting my drift?


It was a usual Saturday afternoon when I stepped into my local fabric shop More Sewing to buy some buttons and lining and spotted one of their new additions.  After querying the price and fainting(!) I ummed and arrred and left with the buttons/lining/non exciting sewing necessity.  Of course two hours later and before closing I hot footed it back to the shop to purchase 3 metres of the stuff at £14.00 per metre (see what I mean about wallet-emptying?)

I originally thought about a twirly girly skirt in my loved vintage style but decided that a straight dress would show off this fabric to its best advantage.

Anyway with the pre-wash done and the fabric airing on the line I picked my way through my patterns to carefully find the most suitable one to showcase this scrummy find.  I decided on a Burda Style bodice from their vintage collection and my self drafted skirt.  The bodice went together pretty well and I don't usually have any trouble with the skirt - I just had to line up the princess seams with the darts.


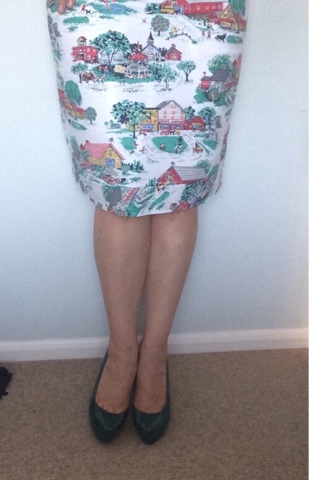
Dress finished I took it off to a Kent Vintage fair and found this cutest of pups in Clarissa Caravan - owned by the talented Clarissa and Co who makes beautiful shabby chic items.  Of course when you find a pup this cute she just has to be photographed, but, wait........ there's too much leg - and it's not the fur covered variety.  My dress turned out nice, apart from the fact that it's not really a Vintage length -I've not seen too many 1950s dresses "over the knee" if at all!


Being a straight dress with a VERY definite pattern I wondered how I could fix (read SAVE) this garment so that I'd feel inclined to wear it again.


After looking at the remnants left behind after cutting I decided the best course of action would be to add a sneaky extra hem, cut on the bias, so it looks as if it has been designed that way.


  Gosh, no one will ever know I cut it wrong in the first place!  I also have to admit I had to add in a triangular godet of lining so that I could actually walk instead of wiggling - saving again!!!


So there you have it - sewing really does SAVE - and sometimes more than once!!!


Happy Daisy.

Lowdown:  Well I bought three metres (who wouldn't with that print) but still have some left so I may be writing a post about remnanting some time: eyewatering £42.00

Lining - already in my stash (saved again!) about 1.5m

Zipper

See what you can save..................

Happy sewing

Daisy


Friday, 22 April 2016

Spiffing Tea Dress

So, last year was a time to discover vintage festivals and events and, as such, there obviously needed to be relevant things to wear to said events.  
  

The event in question for this blog post was The Chap Olympiad  - a thoroughly silly, err, I mean spiffingly eccentric, British do held in one of London's oldest squares at the height of the English summer.  Everyone attending uses the occasion to show off their best vintage style, from Edwardian ladies to dapper gents with handlebar moustaches and much cream tea and champagne is scoffed and quaffed.


Naturally,  I needed an appropriate outfit, and found it with Burda Style . The design lent itself well to the shape I was looking for, as I was after some kind of 30s style tea dress and, apart from a small sleeve adjustment, which I drafted using the assistance of Metric Pattern Cutting, it was pretty much the pattern as was in the book.


The fabric I used was a floral chiffon I had previously purchased in Athens so it was a stashbust. 


It was easy to alter the straight sleeve - the bottom right pic shows the original sleeve and finished sleeve shapes. I also extended the sleeve to make it longer. I cut the bodice on the straight grain and as I had enough fabric, cut the skirt on the bias to give a more 1930s drape.  

It was a fairly easy make, apart from the  fact that handling chiffon is always a bit of a faff. However with some French seams sorted fraying issues and I soon had the pieces put together and fitting well.

Triming the seam ready for "frenching"


If I have any minor complaint/future amend for this pattern it would be that I would slightly alter the front where the neckline meets the bodice as it gaped slightly, but nothing I couldn't fix with a brooch. 


I was pleased with the finished result though and , thanks to the British weather, it was perfect for the scorching hot day.  


So there's my tea dress dress attempt. Teamed with a vintage feather hat I felt suitably vintage enough.  Now here's a couple of pics of the silliness......


The Olympiad Stadium


Even more silliness.


Drinking champagne and being silly is very tiring.

So there you have it.  A very vintage dress for a very British day..

Why don't you make a vintage dress and book your place at the Chap Olympiad? This year's Chap is on 16 July so there's still time if you get sewing.

Details.  I used about 1.5m of 160 wide chiffon georgette.

Cost: really can't remember but it's bound to have been an Athens bargain.

Happy sewing

Linda xx


Monday, 4 April 2016

Fabric and Vintage Style Ready - Check


Sometimes find a bargain and other times you find a real bargain.  I'm sure you've guessed by now that this is what happened to me and you'd be exactly right. 


Well the vintage style is almost always ready but this time the fabric was ready for a long time before I decided what to do with it.


The fabric in question is a black yellow and white madras check lightweight taffeta purchased from one of my fave fabric bargain shops, somewhere on Kalamiotou, Athens.  It was a last minute purchase and and on at the princely sum of 2 euros per metre - so I took 3 metres.

It sat for many months in the stash until I realised I needed a new dress for The Pinup Picnic in the Park,  a wonderfully English summer occasion organised by the The British Belles last June. 


As I'd been going full steam ahead on my self drafted strapless bodice I decided to use the taffeta in the same style with a full skirt for a vintage halter neck swing dress.  


It's a good job this fabric came in at a bargain, not because I fouled up, but cos it was a mare to sew, with a high  frayage factor. Add to this the tissue weight lightness and it wasn't the easiest of makes.  

Being the sewing soldier that I am, I trundled on and it was a good job I'd had experience with my pattern which meant there were no nasty surprises.


I think the end result looks pretty passable, even if I didn't line up those little checky guys!


So off I went on a flaming hot day in June up to Marble Arch where I met up with a gaggle of vintage goodness including the delightful Miss Amy May of Miss Amy May  pinup fashion and style expert. Lots of me mades there. We had such a wonderful picnic.


I met some fabulously wonderful vintage loving ladies and we were so lucky with the sunshine, I'm it was the hottest day of the year and most of us ended up trying to find some shade.


As you can see, everyone got in the party  mood. 


I'm not sure how many times I'll get to wear this dress, however, at 6 euros, I'm not counting the cost per wear.  It was just nice to do another version of my self draft in a different fabric.  

So, what to take from my post .......


You can take one pattern and make it in many different fabrics and you'll truly get a different garment every time.  So..... Give it a go.... Self draft or ready made pattern, one way or another you'll get some success. 


Details

Fabric:  3 metres of 150cm wide taffeta at 2 euros per metre from Athens. 

1/2 metre lining

Zipper 


Get going.... 


Happy sewing 


Linda xx